Building boot software and Debian with HDMI support from sources for a RISC-V board (Sipeed Lichee RV with D1 processor)
Table of Contents
The short story
The objective of the work described below was for me:
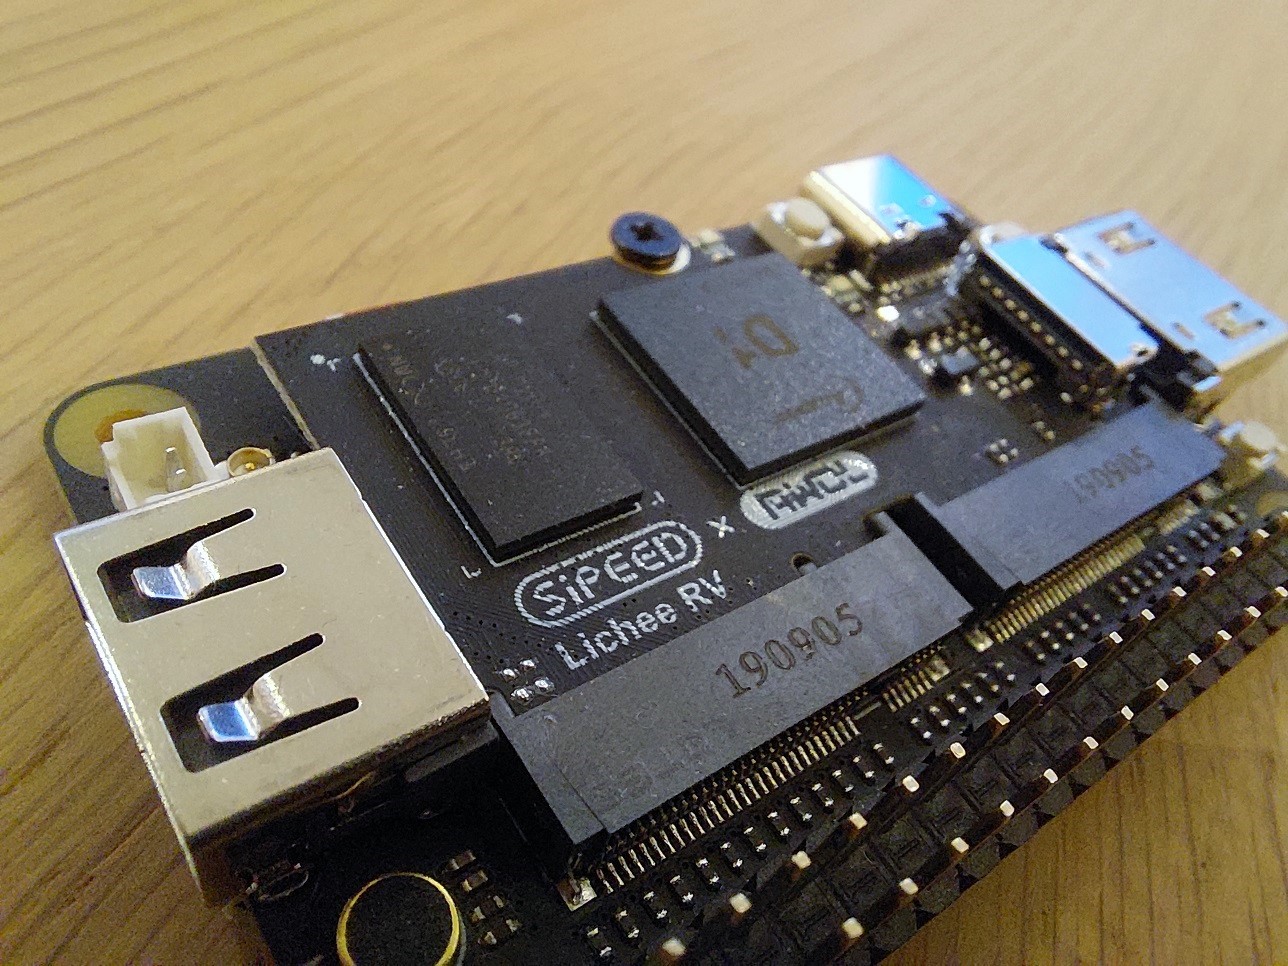
- to have a bootable SD card for the Sipeed Lichee RV (a RISC-V board with the single core D1 processor = compute module (CM) + a carrier board (Lichee RV Dock) with HDMI interface, Wifi, BT, etc - see specification) that was generated from source that I know,
- to learn how to build from sources the boot software for a new hardware target, and assemble and boot a Linux distribution for RISC-V.
There is a long description below for those interested on how to generate the binaries for the RISC-V board and produce the root fs containing Debian Linux. For those who don't want to exercise the steps below, I have generated tar archives for the boot software binaries and Linux kernel and the rootfs with which you can quickly generate an SD card to boot the board and run Debian Linux.
Create the SD card
Unpack the first tar archive (the boot software binaries and Linux kernel) in a new directory and copy/move the rootfs tar archive into the same directory.
Check that the SD card connected to the computer is not mounted. If so, unmount it.
Executed the following steps as root (replace sdX by the correct device of your SD card):
dd if=/dev/zero of=/dev/sdX bs=1M count=200
parted -s -a optimal -- /dev/sdX mklabel gpt
parted -s -a optimal -- /dev/sdX mkpart primary ext2 40MiB 100MiB
parted -s -a optimal -- /dev/sdX mkpart primary ext4 100MiB -1GiB
parted -s -a optimal -- /dev/sdX mkpart primary linux-swap -1GiB 100%
mkfs.ext2 /dev/sdX1
mkfs.ext4 /dev/sdX2
mkswap /dev/sdX3
dd if=sun20i_d1_spl/nboot/boot0_sdcard_sun20iw1p1.bin of=/dev/sdc bs=8192 seek=16
dd if=u-boot.toc1 of=/dev/sdc bs=512 seek=32800
mkdir -p /mnt/sdcard_boot
mkdir -p /mnt/sdcard_rootfs
### boot partition
mount /dev/sdX1 /mnt/sdcard_boot
cp linux-build/arch/riscv/boot/Image.gz /mnt/sdcard_boot
cp boot.scr /mnt/sdcard_boot
umount /mnt/sdcard_boot
### rootfs partition
mount /dev/sdX2 /mnt/sdcard_rootfs
tar xfJ licheerv-debian-rootfs_2022-03-11.tar.xz -C /mnt/sdcard_rootfs
umount /mnt/sdcard_rootfs
rm -rf /mnt/sdcard_boot
rm -rf /mnt/sdcard_rootfs
You can either use the board via the serial interface (via GPIO connector) or you set-up the wifi as desribed below and the board will connect with the name "licheerv" to the wifi network.
Wifi setup
Create wpa supplicant config file with your SSID and passphrase:
mount /dev/sdX2 /mnt/sdcard
sudo sh -c 'wpa_passphrase myssid my_very_secret_passphrase > /mnt/sdcard/etc/wpa_supplicant/wpa_supplicant.conf'
sudo sh -c 'printf "ctrl_interface=/run/wpa_supplicant\nupdate_config=1\n" >> /mnt/sdcard/etc/wpa_supplicant/wpa_supplicant.conf'
Update in /mnt/sdcard/etc/network/interfaces the wpa-ssid and wpa-psk with the information from the wpa_supplicant.conf above, and unmount /dev/sdX2.
Boot-up the board
Put the SD card into the board and connect power. After 60s, you can connect via ssh with the board. Check your router which IP address was given to a computer called licheerv. The login via ssh is rv/licheerv and via serial interface root/rootpwd.
Welcome to a RISC-V board with software created from sources!
Open issues
HDMI
There seems to be a HDMI kernel driver available in the D1-tina-linux-5.4 for the Lichee RV carrier board, but I haven't had time to work on this yet. Hopefully this will allow to have a full graphical system.
sun6i-rtc kernel driver issue
If the ntp daemon is installed, one will get, after a few minutes, every second a message in the message log like this:
licheerv kernel: [ 121.658384] sun6i-rtc 7090000.rtc: rtc is still busy.
Hence I use ntpdate, instead of ntp, to update the clock once at boot. Should be sufficient, but not ideal.
The long story
The documentation of the process is not only meant to reproduce the binaries I have made available above, but also to have this as a reference for future work on RISC-V boards.
All the steps below have been executed on Debian Bullseye, but should also be possible with Debian derivatives like Ubuntu or Raspberry Pi OS. However, it is recommended to have at least 2GB of RAM, since the cloning of the Linux kernel needs quite some RAM, and 30GB of disk space for all the files created in the process below.
There are two steps:
- The build of all the binaries needed to boot and the Linux kernel itself, and
- Creation of the root file system of Debian.
(i) Building the binaries
Create a directory (e.g. build-boot-sw-for-licheerv) and enter into it and executed all the below in this folder.
mkdir -p build-boot-sw-for-licheerv-hdmi
cd build-boot-sw-for-licheerv-hdmi
Building the RISC-V gnu toolchain
To build the RISC-V gnu toolchain, the following packages should be installed:
sudo apt install autoconf automake autotools-dev curl python3 libmpc-dev libmpfr-dev libgmp-dev gawk build-essential bison flex texinfo gperf libtool patchutils bc zlib1g-dev libexpat-dev swig libssl-dev python3-distutils python3-dev git
Building the toolchain (might take 1-2h):
export cwd=`pwd`
git clone --recursive https://github.com/riscv/riscv-gnu-toolchain
cd riscv-gnu-toolchain
git checkout df6ecbe4ddb2a1a261b44af822d22f1253d3f0e4
./configure --prefix=$cwd/riscv64-unknown-linux-gnu --with-arch=rv64gc --with-abi=lp64d
make linux -j `nproc`
export PATH=$cwd/riscv64-unknown-linux-gnu/bin:$PATH
cd ..
The riscv64 compiler is now installed in the folder riscv64-unknown-linux-gnu.
NB: it can happen that the cloning fails. In this case, go into the directory and execute:
cd riscv-gnu-toolchain
git submodule update --init --recursive
Boot0
Building the Boot0 binary:
git clone https://github.com/smaeul/sun20i_d1_spl
cd sun20i_d1_spl
git checkout 4da9c518c124d6f6123bf274e449514863df3646
make CROSS_COMPILE=$cwd/riscv64-unknown-linux-gnu/bin/riscv64-unknown-linux-gnu- p=sun20iw1p1 mmc
cd ..
The binary is located here: sun20i_d1_spl/nboot/boot0_sdcard_sun20iw1p1.bin
OpenSBI
Building the opensbi binary:
git clone https://github.com/smaeul/opensbi
cd opensbi
git checkout d1-wip
make CROSS_COMPILE=$cwd/riscv64-unknown-linux-gnu/bin/riscv64-unknown-linux-gnu- PLATFORM=generic FW_PIC=y FW_OPTIONS=0x2
cd ..
The binary is located here: opensbi/build/platform/generic/firmware/fw_dynamic.bin
U-Boot
Building the u-boot binary:
git clone https://github.com/smaeul/u-boot
cd u-boot
git checkout d1-2022-04-05
make CROSS_COMPILE=$cwd/riscv64-unknown-linux-gnu/bin/riscv64-unknown-linux-gnu- lichee_rv_defconfig
make -j `nproc` ARCH=riscv CROSS_COMPILE=$cwd/riscv64-unknown-linux-gnu/bin/riscv64-unknown-linux-gnu- all V=1
cd ..
The binary is located here: u-boot/arch/riscv/dts/sun20i-d1-lichee-rv-dock.dtb
Generate u-boot toc
Create a file licheerv_toc1.cfg with the following contents:
[opensbi]
file = opensbi/build/platform/generic/firmware/fw_dynamic.bin
addr = 0x40000000
[dtb]
file = u-boot/arch/riscv/dts/sun20i-d1-lichee-rv-dock.dtb
addr = 0x44000000
[u-boot]
file = u-boot/u-boot-nodtb.bin
addr = 0x4a000000
and then execute:
./u-boot/tools/mkimage -T sunxi_toc1 -d licheerv_toc1.cfg u-boot.toc1
which produces the file: u-boot.toc1
Build the Linux kernel
Build the linux kernel with the default configuration licheerv_linux_defconfig:
git clone https://github.com/smaeul/linux
mkdir -p linux-build/arch/riscv/configs
cp licheerv_linux_defconfig linux-build/arch/riscv/configs/licheerv_defconfig
cd linux
git checkout d1-wip-v5.18-rc1
cd ..
make ARCH=riscv -C linux O=$cwd/linux-build licheerv_defconfig
make -j `nproc` -C linux-build ARCH=riscv CROSS_COMPILE=$cwd/riscv64-unknown-linux-gnu/bin/riscv64-unknown-linux-gnu- V=1
On the last make execution you will be ask some questions. Just take the defaults (i.e. press Enter).
The kernel image is located in: linux-build/arch/riscv/boot/Image.gz
Build the wifi chip kernel module (Realtek 8723DS)
Build the driver for the wifi chip Realtek 8723DS, the wifi chip on the carrier board, with the following commands:
git clone https://github.com/lwfinger/rtl8723ds
cd rtl8723ds
make -j `nproc` ARCH=riscv CROSS_COMPILE=$cwd/riscv64-unknown-linux-gnu/bin/riscv64-unknown-linux-gnu- KSRC=$cwd/linux-build modules
cd ..
The kernel modules for the wifi is located here: rtl8723ds/8723ds.ko
(ii) Creation of the rootfs of Debian.
Debootstrap
Before being able to create the chroot for RISC-V, one has to install some packages:
sudo apt install debootstrap debian-ports-archive-keyring qemu-user-static qemu-utils qemu-system-misc binfmt-support
We create the rootfs of Debian using debootstrap. Since the base system is not sufficient, additional packages are requested to be installed:
sudo debootstrap --arch=riscv64 --keyring /usr/share/keyrings/debian-ports-archive-keyring.gpg --components=main,contrib,non-free --include=debian-ports-archive-keyring,pciutils,autoconf,automake,autotools-dev,curl,python3,libmpc-dev,libmpfr-dev,libgmp-dev,gawk,build-essential,bison,flex,texinfo,gperf,libtool,patchutils,bc,zlib1g-dev,wpasupplicant,htop,net-tools,wireless-tools,firmware-realtek,ntpdate,openssh-client,openssh-server,sudo,e2fsprogs,git,man-db,lshw,dbus,wireless-regdb,libsensors5,lm-sensors,swig,libssl-dev,python3-distutils,python3-dev,alien,fakeroot,dkms,libblkid-dev,uuid-dev,libudev-dev,libaio-dev,libattr1-dev,libelf-dev,python3-setuptools,python3-cffi,python3-packaging,libffi-dev,libcurl4-openssl-dev,python3-ply,iotop,tmux,psmisc,dbus-user-session,xorg,lightdm,openbox-lxde-session,lxde unstable rootfs http://deb.debian.org/debian-ports
The root filesystem is now in the folder rootfs. A few additional configurations are needed:
Install kernel modules
Install the kernel modules in rootfs/lib/modules/5.17.0-rc2-379425-g06b026a8b714:
cd linux-build
sudo make modules_install ARCH=riscv INSTALL_MOD_PATH=../rootfs KERNELRELEASE=5.18.0-rc1-395456-gcc63db754b21
cd ..
Copy the wifi kernel module (8723ds.ko):
sudo install -D -p -m 644 rtl8723ds/8723ds.ko rootfs/lib/modules/5.18.0-rc1-395456-gcc63db754b21/kernel/drivers/net/wireless/8723ds.ko
Remove references to build and sources:
sudo rm rootfs/lib/modules/5.18.0-rc1-395456-gcc63db754b21/build
sudo rm rootfs/lib/modules/5.18.0-rc1-395456-gcc63db754b21/source
and then run depmod:
sudo depmod -a -b rootfs 5.18.0-rc1-395456-gcc63db754b21
Finally register the wifi kernel modules to be loaded at boot in /etc/modules by adding a new line with 8723ds.
sudo sh -c 'echo "8723ds" >> rootfs/etc/modules'
Root passwd
Setting the root passwd by generating first the hash
openssl passwd -1 -salt root rootpwd
and then insert it in rootfs/etc/shadow in the line with root:*:... replacing the *
sudo nano rootfs/etc/shadow
fstab
Setting boot and root file system as rw in rootfs/etc/fstab and adding the swap (see above where we created a partition for swap):
# <device>        <dir>        <type>        <options>            <dump> <pass>
/dev/mmcblk0p1    /boot        ext2          rw,defaults,noatime  1      1
/dev/mmcblk0p2    /            ext4          rw,defaults,noatime  1      1
/dev/mmcblk0p3    swap         swap          defaults,noatime     0      0
Wifi
Create wpa supplicant config file with your SSID and passphrase:
sudo sh -c 'wpa_passphrase myssid my_very_secret_passphrase > rootfs/etc/wpa_supplicant/wpa_supplicant.conf'
Recommendation: Remove the line with the plain text of you passphrase (psk="my_very_secret_passphrase") in wpa_supplicant.conf.
Since wpa_supplicant v2.6, you need to add following in your rootfs/etc/wpa_supplicant/wpa_supplicant.conf:
ctrl_interface=/run/wpa_supplicant
update_config=1
Add wlan0 to rootfs/etc/network/interfaces and configure it to use DHCP (use the PSK from rootfs/etc/wpa_supplicant/wpa_supplicant.conf).
allow-hotplug wlan0
iface wlan0 inet dhcp
    wpa-ssid myssid
    wpa-psk my_very_secret_passphrase_PSK
Hostname
Set the hostname in rootfs/etc/hostname to licheerv (the same as used during the build of the kernel) so that you can identify the board in your (wifi) network.
Set date via ntpdate
The Lichee RV board doesn't have a battery buffered clock, hence one has to get the date via ntp at boot. This can be done via crontab by adding in rootfs/var/spool/cron/crontabs/root the following:
sudo sh -c 'echo "@reboot for i in 1 2 3 4 5; do /usr/sbin/ntpdate 0.europe.pool.ntp.org && break || sleep 15; done" >> rootfs/var/spool/cron/crontabs/root'
sudo chmod 600 rootfs/var/spool/cron/crontabs/root
Add new user "rv"
Finally we add a new user with login rv:
sudo useradd -R `pwd`/rootfs -s /bin/bash rv
sudo mkdir -p rootfs/home/rv
Set the password of rv to licheerv by creating the hash
sudo openssl passwd -1 -salt rv licheerv
and then insert it in rootfs/etc/shadow in the line with rv:!:... replacing the !.
Copy the default config files for a new user into the home folder:
sudo cp rootfs/etc/skel/.bash* rootfs/home/rv/
sudo cp rootfs/etc/skel/.profile rootfs/home/rv/
sudo chown -R 1000:1000 rootfs/home/rv
Add rv to the sudo group in rootfs/etc/group so that the line in this file looks like this:
sudo:x:27:rv
u-boot script
To automatically boot Debian, we create a u-boot script (licheerv_u-boot-bootscr.txt) with the following contents:
echo "Loading kernel from mmc 0:1 to address $kernel_addr_r"
load mmc 0:1 ${kernel_addr_r} Image.gz
setenv bootargs "earlycon=sbi console=ttyS0,115200n8 hdmi.audio=EDID:0 disp.screen0_output_mode=1920x1080p60 root=/dev/mmcblk0p2 delayacct slub_debug"
echo "Booting kernel with bootargs as $bootargs; and fdtcontroladdr is $fdtcontroladdr"
setenv kernel_comp_addr_r "0x44000000"
setenv kernel_comp_size "0xb000000"
booti ${kernel_addr_r} - ${fdtcontroladdr}
And then generate the boot script:
u-boot/tools/mkimage -T script -O linux -d licheerv_u-boot-bootscr.txt boot.scr
Produce the tar balls
To produce the tar balls referenced at the top, execute the following commands in the directory build-boot-sw-for-licheerv-hdmi:
mkdir -p ../build-boot-sw-for-licheerv-hdmi_tar
install -p -D sun20i_d1_spl/nboot/boot0_sdcard_sun20iw1p1.bin ../build-boot-sw-for-licheerv-hdmi_tar/sun20i_d1_spl/nboot/boot0_sdcard_sun20iw1p1.bin
install -p -D u-boot.toc1 ../build-boot-sw-for-licheerv-hdmi_tar/u-boot.toc1
install -p -D linux-build/arch/riscv/boot/Image.gz ../build-boot-sw-for-licheerv-hdmi_tar/linux-build/arch/riscv/boot/Image.gz
install -p -D boot.scr ../build-boot-sw-for-licheerv-hdmi_tar/boot.scr
cd ../build-boot-sw-for-licheerv-hdmi_tar
tar czf ../licheerv-hdmi-bootsw-linux-kernel_2022-04-18.tgz .
cd ../build-boot-sw-for-licheerv-hdmi/rootfs
sudo tar czf ../../licheerv-hdmi-debian-rootfs_2022-04-18.tgz .
# sudo XZ_OPT="-9 -T8" tar -Jcf ../../licheerv-hdmi-debian-rootfs_2022-04-18.tar.xz .
cd ../..
...later on in Debian
To get rid of an error message that might come ("platform regulatory.0: Direct firmware load for regulatory.db failed with error -2"), execute:
sudo update-alternatives --set regulatory.db /lib/firmware/regulatory.db-upstream
and update:
sudo apt update
sudo apt upgrade